
How to Add Drone Labels to Images for Real Estate Photography
Learn how to add labels, property boundaries, points of interest and distance markers to drone images for real estate photography and property marketing.
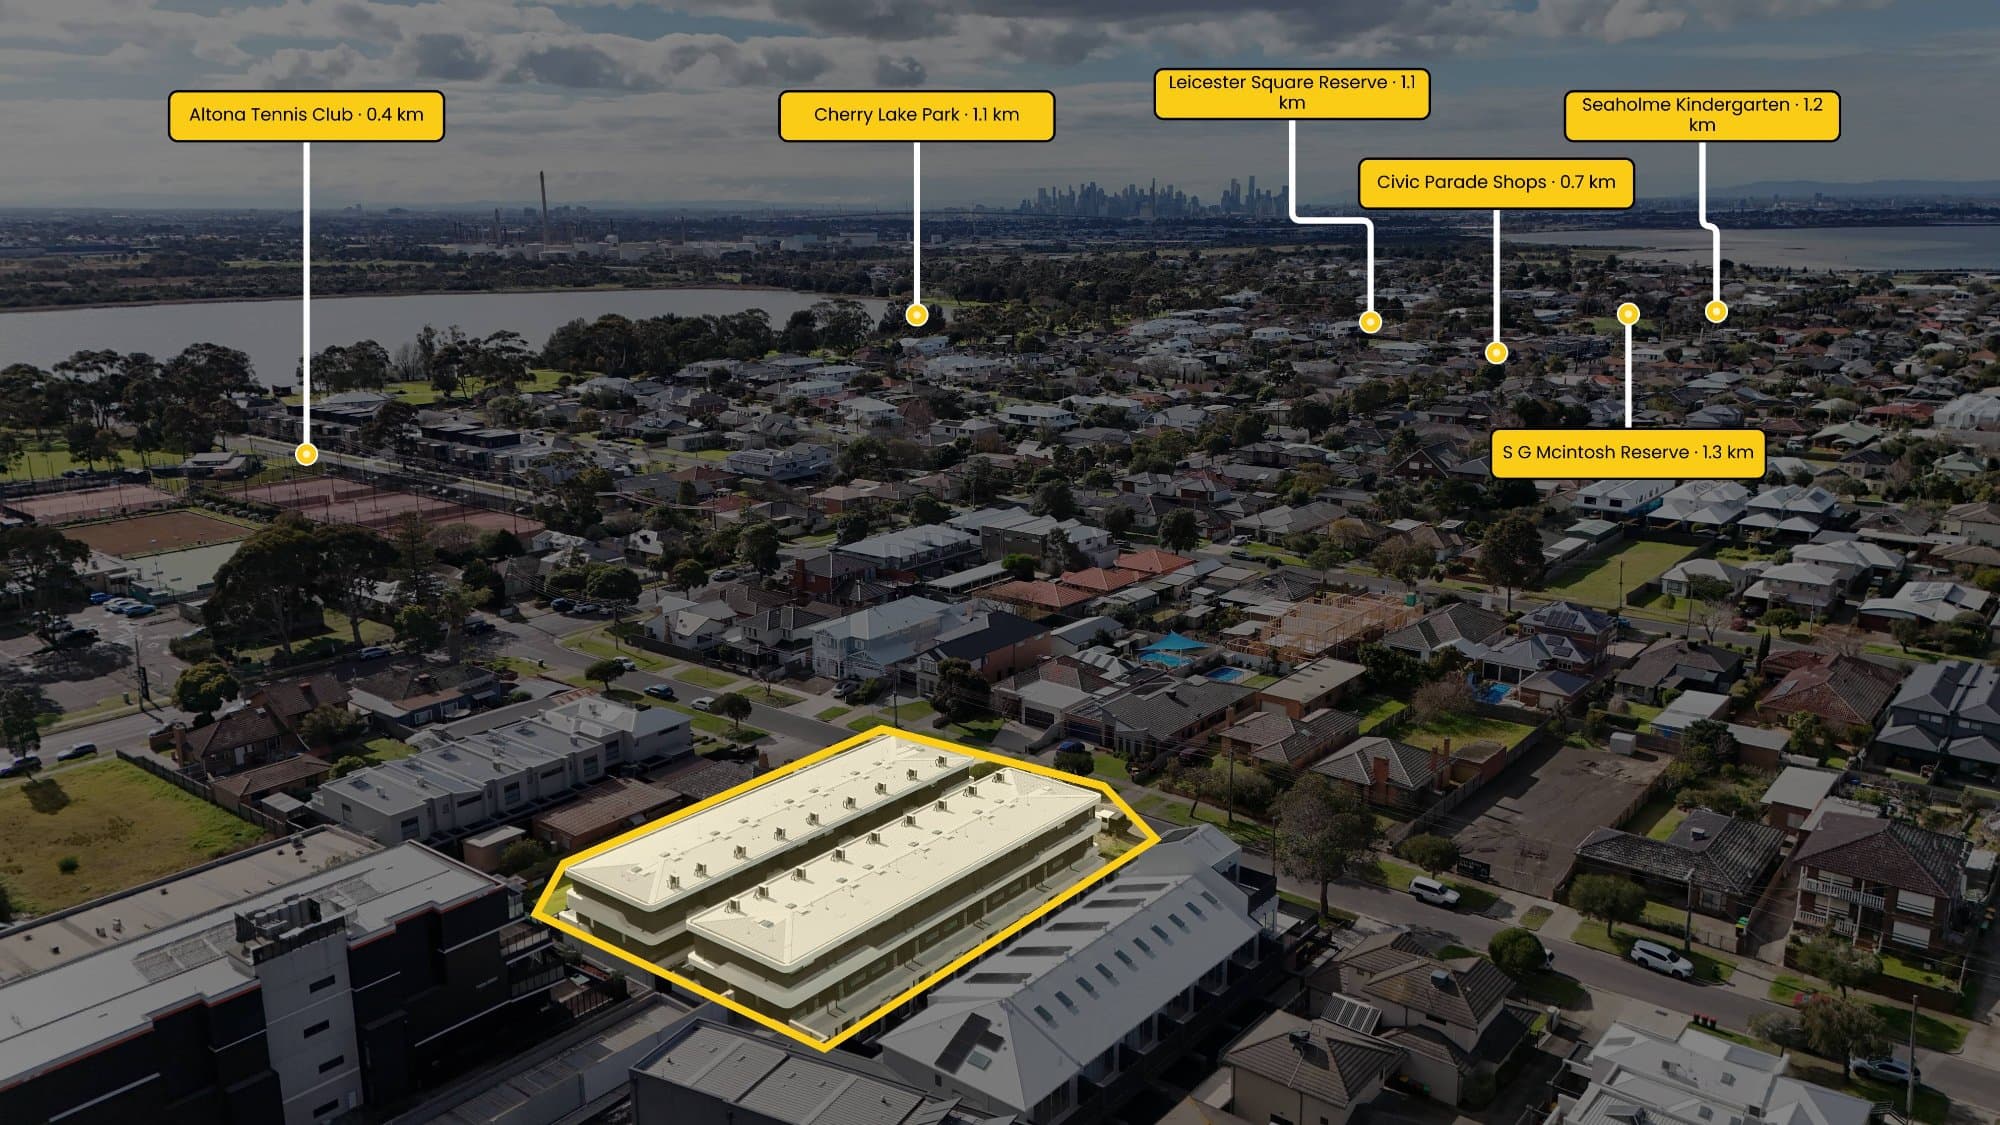
Drone photography has become an important part of modern real estate marketing. An aerial image can show far more than the exterior of a property, including the size of the block, surrounding streets, nearby parks and the relationship between the property and its surroundings.
Adding labels to drone images can make these aerial photographs even more useful.
Real estate photographers can add property boundaries, street names, nearby amenities, distance measurements and points of interest to help potential buyers understand the location and layout of a property.
Here's how to create professional-looking annotated drone images for real estate photography.
What Are Drone Labels?
Drone labels are visual elements added to an aerial photograph to provide additional information about the property.
Common examples include:
- Property boundaries
- Street names
- Property labels
- Parks
- Schools
- Shopping centres
- Train stations
- Beaches
- Distance markers
- Points of interest
- Direction indicators
Instead of showing buyers only an aerial photograph, labels turn the image into an informative real estate marketing graphic.
Why Add Labels to Real Estate Drone Photos?
A standard drone photograph can show the property from above, but it may not immediately communicate everything a buyer needs to know.
For example, a photograph might show a large backyard but leave the viewer wondering where the property's boundary ends.
Adding a boundary overlay can make this clearer.
Similarly, a property may be close to a park or shopping centre, but the buyer may not know exactly where it is located.
Labels can provide this additional context.
1. Start With a High-Quality Drone Image
The first step is capturing a good aerial photograph.
For real estate photography, make sure the image clearly shows the property and enough of the surrounding area to provide useful context.
If you're using a DJI drone, location information may also be stored in the image's EXIF metadata.
This information can potentially be used by software to determine where the photograph was captured.
Always check your original image before editing it.
2. Identify the Property Boundary
The next step is identifying the property's approximate boundary.
You can then overlay the boundary onto the aerial photograph.
A simple line around the property can make a significant difference to how easily the image can be understood.
For example:
Property → Boundary → Street → Surrounding properties
When creating marketing graphics, make sure the boundary information is accurate and avoid presenting an approximate visual overlay as a legal cadastral or survey boundary.
3. Add Property Labels
Once the boundary is established, you can add labels to important locations.
For example:
SUBJECT PROPERTY
This immediately tells the viewer which property they're looking at.
You can then add other labels around the image to provide geographical context.
Keep labels short and easy to read. Aerial photographs can contain a lot of visual information, so excessive text can quickly make an image difficult to understand.
4. Add Points of Interest
Points of interest can help demonstrate the property's surrounding amenities.
Depending on the property, you could highlight:
- Local schools
- Parks
- Shopping centres
- Public transport
- Train stations
- Sporting facilities
- Beaches
- Cafes
- Major roads
For example, an aerial photograph could show:
SUBJECT PROPERTY
↓ 450 m
LOCAL PARK
This provides visual context that isn't available from a standard property photograph.
5. Add Distance Markers
Distance markers can make an aerial image even more informative.
You could show approximate distances between the property and nearby locations.
For example:
350 m → Park
800 m → Shopping Centre
1.2 km → Train Station
The measurements should be generated from reliable location data and presented as approximate where appropriate.
6. Keep Your Design Consistent
One of the biggest mistakes with aerial property annotations is making the image too complicated.
Your labels should complement the photograph rather than overwhelm it.
Consider keeping consistent:
- Fonts
- Font sizes
- Line thickness
- Icons
- Label placement
- Boundary appearance
- Distance markers
If you're working with multiple real estate agencies, creating a consistent preset can also help you maintain the same visual style across different properties.
7. Using Photoshop to Add Drone Labels
One option is to use Adobe Photoshop.
Photoshop provides extensive control over layers, text, shapes and graphics.
A typical workflow might involve:
- Importing the drone photograph.
- Creating a new layer.
- Drawing the property boundary.
- Adding text labels.
- Adding icons.
- Creating distance lines.
- Adjusting typography.
- Exporting the final image.
Photoshop works well for highly customised graphics, but manually repeating these steps for every property can become time-consuming.
8. Using AerialPin to Annotate Drone Images
For photographers who regularly create annotated aerial property images, AerialPin provides a workflow specifically designed around this task.
Instead of manually creating every annotation from scratch, AerialPin can be used to add property boundaries, labels and points of interest to aerial property photographs.
The workflow is designed to be simple:
Upload your drone image → Add your property information → Add labels → Export.
This can be particularly useful for real estate photographers processing multiple properties every week.
9. Make Sure Labels Don't Cover Important Features
Placement matters.
Avoid putting labels directly over:
- The house
- Swimming pools
- Driveways
- Important landscaping
- Property boundaries
- Other important visual features
The purpose of a label is to provide information without making the underlying photograph harder to understand.
A clean aerial image with strategically positioned annotations will generally look more professional than one covered in text and markers.
10. Export the Image for Property Marketing
Once your labels are complete, export the final image at an appropriate resolution.
Your aerial image may be used across:
- Real estate websites
- Property portals
- Social media
- Digital advertising
- Agent websites
- Property brochures
- Email marketing
Keep an original unannotated version of the photograph as well. This allows you to make changes or create alternative versions later.
Drone Labels Can Make Aerial Photography More Useful
A drone photograph already provides a unique perspective of a property. Adding useful information can turn that photograph into a more powerful marketing asset.
Property boundaries can show the extent of the land. Points of interest can demonstrate the surrounding amenities. Distance markers can provide additional context, while simple labels can make the image easier to understand.
For real estate photographers, the challenge is doing this efficiently without spending unnecessary time manually creating graphics.
That's where a purpose-built workflow can help.
AerialPin is designed to help real estate photographers annotate aerial property images faster, so they can spend less time manually creating labels and more time photographing properties.
Final Takeaway
If you're creating drone photography for real estate, adding carefully designed labels can make your aerial images more informative and engaging.
The key is to keep the annotations:
Accurate. Clear. Consistent. Easy to read.
When done correctly, a labelled drone photograph can communicate not only what a property looks like, but also where it sits, how much land it occupies and what's around it.