
How to Add Location Pins on Photoshop for Drone Photos
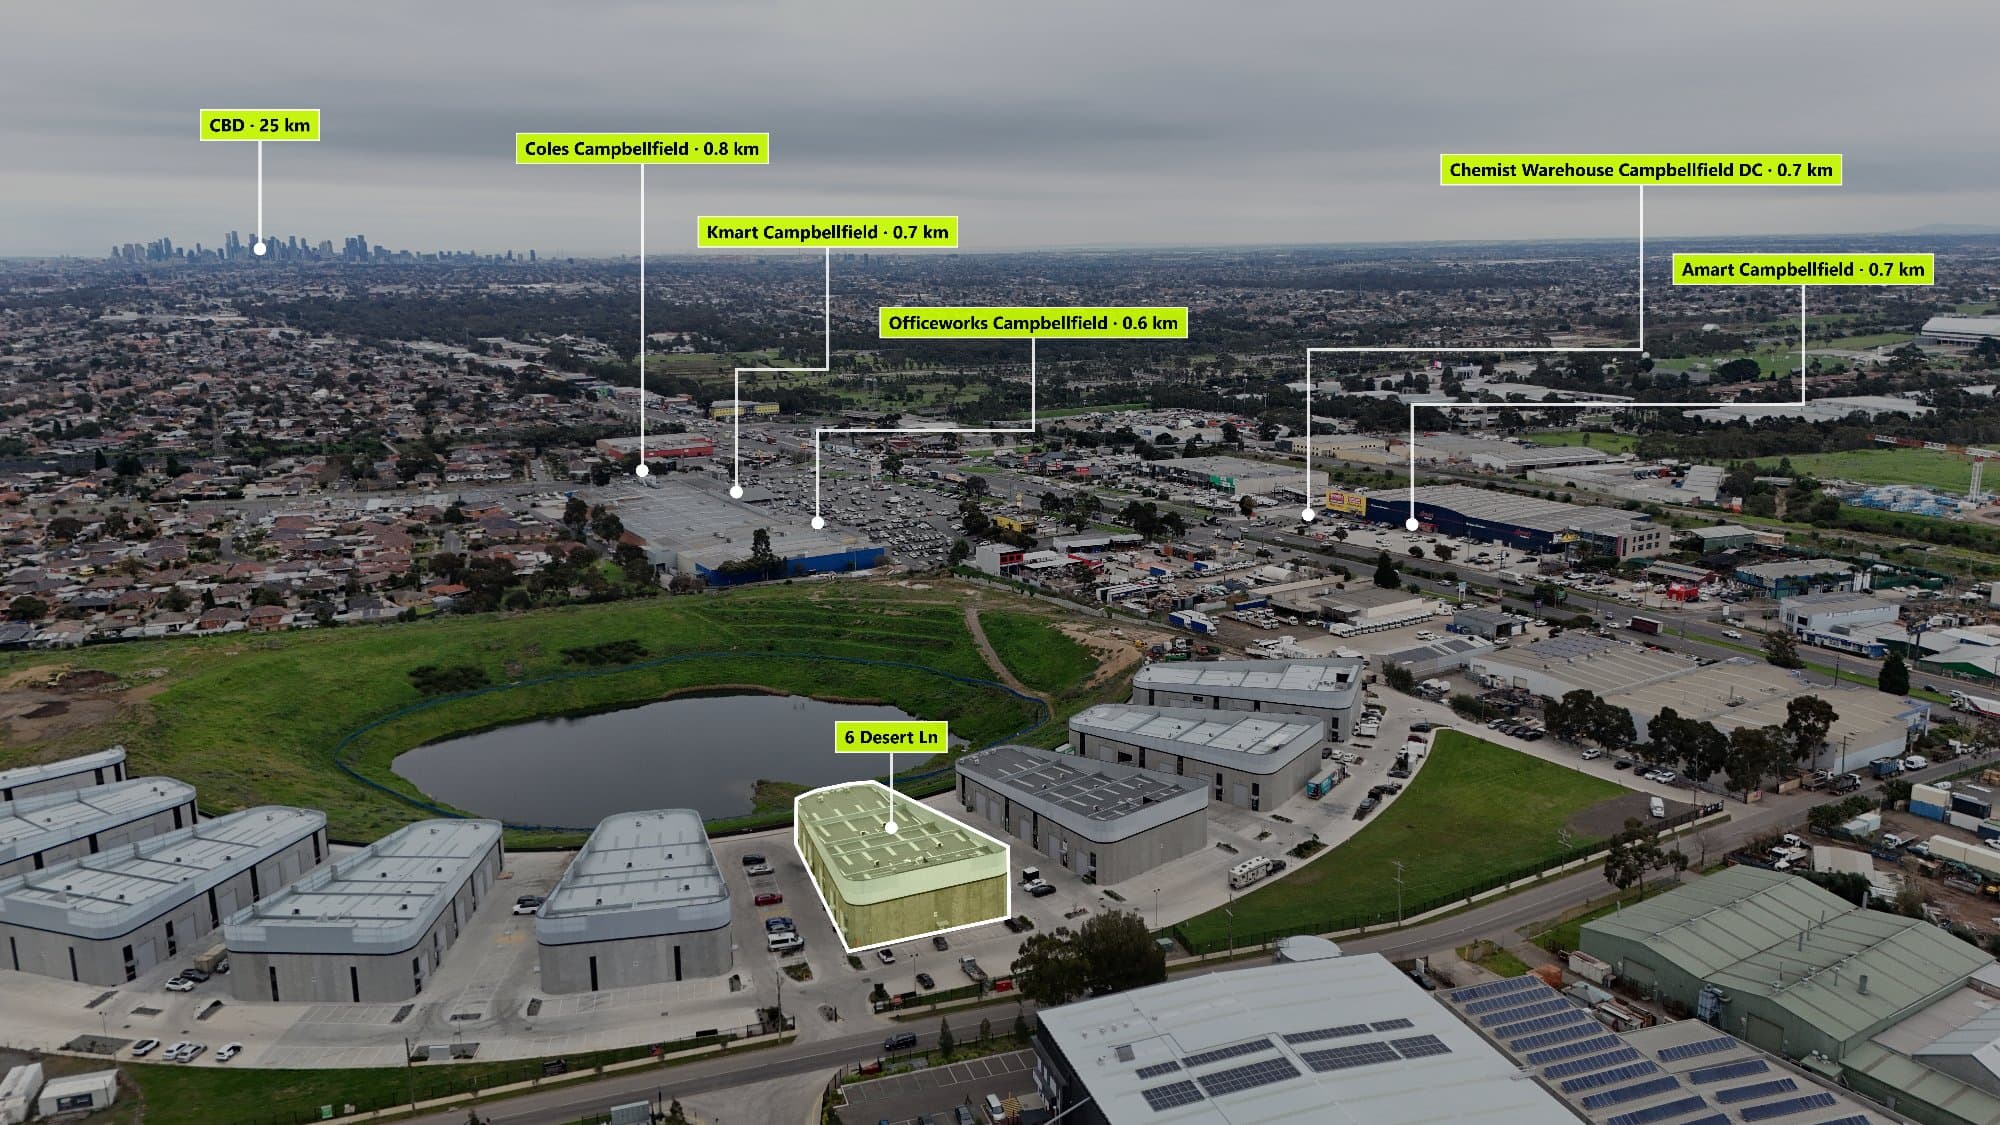
Learn how to manually add location pins to drone photos using Photoshop and discover how AI-powered tools like AerialPin make aerial image annotation faster and more accurate.
Adding location pins to aerial images is a popular way to showcase nearby landmarks, amenities and important locations around a property.
For real estate photography, a simple drone image can become a much stronger marketing asset when buyers can see nearby:
- Schools
- Parks
- Shopping centres
- Train stations
- Beaches
- Restaurants
- Local landmarks
Adobe Photoshop can be used to manually create location pins and labels, but the process requires time, design skills and careful placement.
For photographers managing multiple properties, automated tools like AerialPin can help create professional aerial annotations faster.
Why Add Location Pins to Drone Photos?
Aerial images provide a unique view of a property, but they do not always explain what surrounds it.
Adding location pins helps viewers understand:
- Where important amenities are located
- How close services are to the property
- The lifestyle benefits of the area
- The property's overall location advantage
For real estate marketing, this additional information can help buyers make decisions faster.
How to Add Location Pins in Photoshop
Step 1: Open Your Drone Image
Open your aerial image in Photoshop.
For the best quality, use a high-resolution image captured from your drone.
RAW drone images provide more editing flexibility, allowing you to adjust:
- Exposure
- Colour
- Contrast
- Shadows
- Highlights
before adding annotations.
Step 2: Find Nearby Locations
Before creating your pins, identify the locations you want to highlight.
Common sources include:
- Google Maps
- Google Earth
- Local council maps
- Property information platforms
Find relevant points of interest such as schools, parks, shopping centres and transport.
Choose locations that add value to the property rather than adding unnecessary information.
Step 3: Create a Location Pin Graphic
In Photoshop, you can create a location marker manually.
Common methods include:
- Using the Shape Tool
- Importing an SVG icon
- Creating a custom pin design
- Using a downloaded map marker graphic
A professional pin usually includes:
- A marker icon
- Location name
- Clean typography
- Consistent colours
Step 4: Add the Pin to Your Image
Once your pin design is ready:
- Create a new layer
- Place the pin above the image
- Resize it appropriately
- Move it to the desired location
- Add text labels
Keep the pin size consistent across your images.
Large pins can distract from the property, while small pins may become difficult to read.
Step 5: Add Connecting Lines or Arrows
Some photographers add lines or arrows between the property and nearby locations.
This can help clarify the relationship between:
- The home
- A school
- A park
- A shopping centre
However, too many lines can make the image look cluttered.
A clean design is usually more effective.
Step 6: Export Your Finished Image
Once your pins are complete:
- Review the placement
- Check spelling
- Confirm locations
- Export the image
Common export formats include:
- JPEG for listings
- PNG for marketing graphics
- High-resolution files for brochures
The Problem With Manual Photoshop Location Pins
Photoshop gives photographers complete creative control, but it does not understand the aerial image itself.
When adding location pins manually, you still need to estimate:
- Where the location appears
- The correct direction
- The distance from the property
- The camera perspective
This can become difficult because drone images are not flat maps.
A location that looks close on Google Maps may appear differently from the drone's viewpoint.
Why AerialPin Is Faster Than Photoshop
AerialPin is designed specifically for drone image annotation.
Instead of manually searching for locations and placing every marker, AerialPin uses drone image information and AI technology to automate the process.
With AerialPin, you can:
- Upload a drone image
- Detect nearby points of interest
- Automatically place location pins
- Customise the appearance
- Export professional aerial marketing images
This saves photographers significant editing time.
Photoshop vs AerialPin for Location Pins
Photoshop
Best for:
- Detailed photo editing
- Creative designs
- Custom graphics
- Final image adjustments
Limitations:
- Manual location searching
- Manual pin placement
- No drone metadata analysis
- Time-consuming for multiple images
AerialPin
Best for:
- Drone photography
- Real estate marketing
- Aerial annotations
- Location-based image overlays
Advantages:
- Automated POI detection
- AI-powered placement
- Faster workflow
- Built specifically for aerial images
Tips for Professional Location Pins
Keep Labels Simple
Only include locations that matter to buyers.
Use Consistent Branding
Match fonts, colours and styles across all marketing images.
Avoid Overcrowding
Too many pins can distract from the property.
Prioritise Buyer-Relevant Locations
Focus on amenities that influence purchasing decisions.
Who Uses Location Pins on Drone Images?
Real Estate Photographers
Create premium aerial packages for agents.
Real Estate Agents
Show buyers the benefits of a property's location.
Builders
Highlight developments and nearby infrastructure.
Property Developers
Market projects with clear location advantages.
The Future of Aerial Image Annotation
Manual editing will always have a place in professional photography, but automation is changing how photographers work.
AI-powered tools allow professionals to spend less time on repetitive tasks and more time creating content.
With AerialPin, adding location pins to drone photos becomes faster, easier and more accurate.
Final Thoughts
Photoshop can be used to add location pins to drone photos, but the process requires manual research, design work and careful placement.
For photographers creating occasional images, this workflow may be suitable.
For professionals producing regular real estate content, an automated solution can save hours.
AerialPin helps transform drone photos into informative marketing assets by automatically adding accurate location pins and Point of Interest overlays.
Whether you are a drone photographer, real estate agent, builder or property marketer, AerialPin helps you create better aerial images faster.