
How to Add Property Boundaries to Drone Photos for Real Estate Marketing
Learn how to add property boundaries to drone photos for real estate marketing, including aerial annotations, labels, measurements and points of interest.
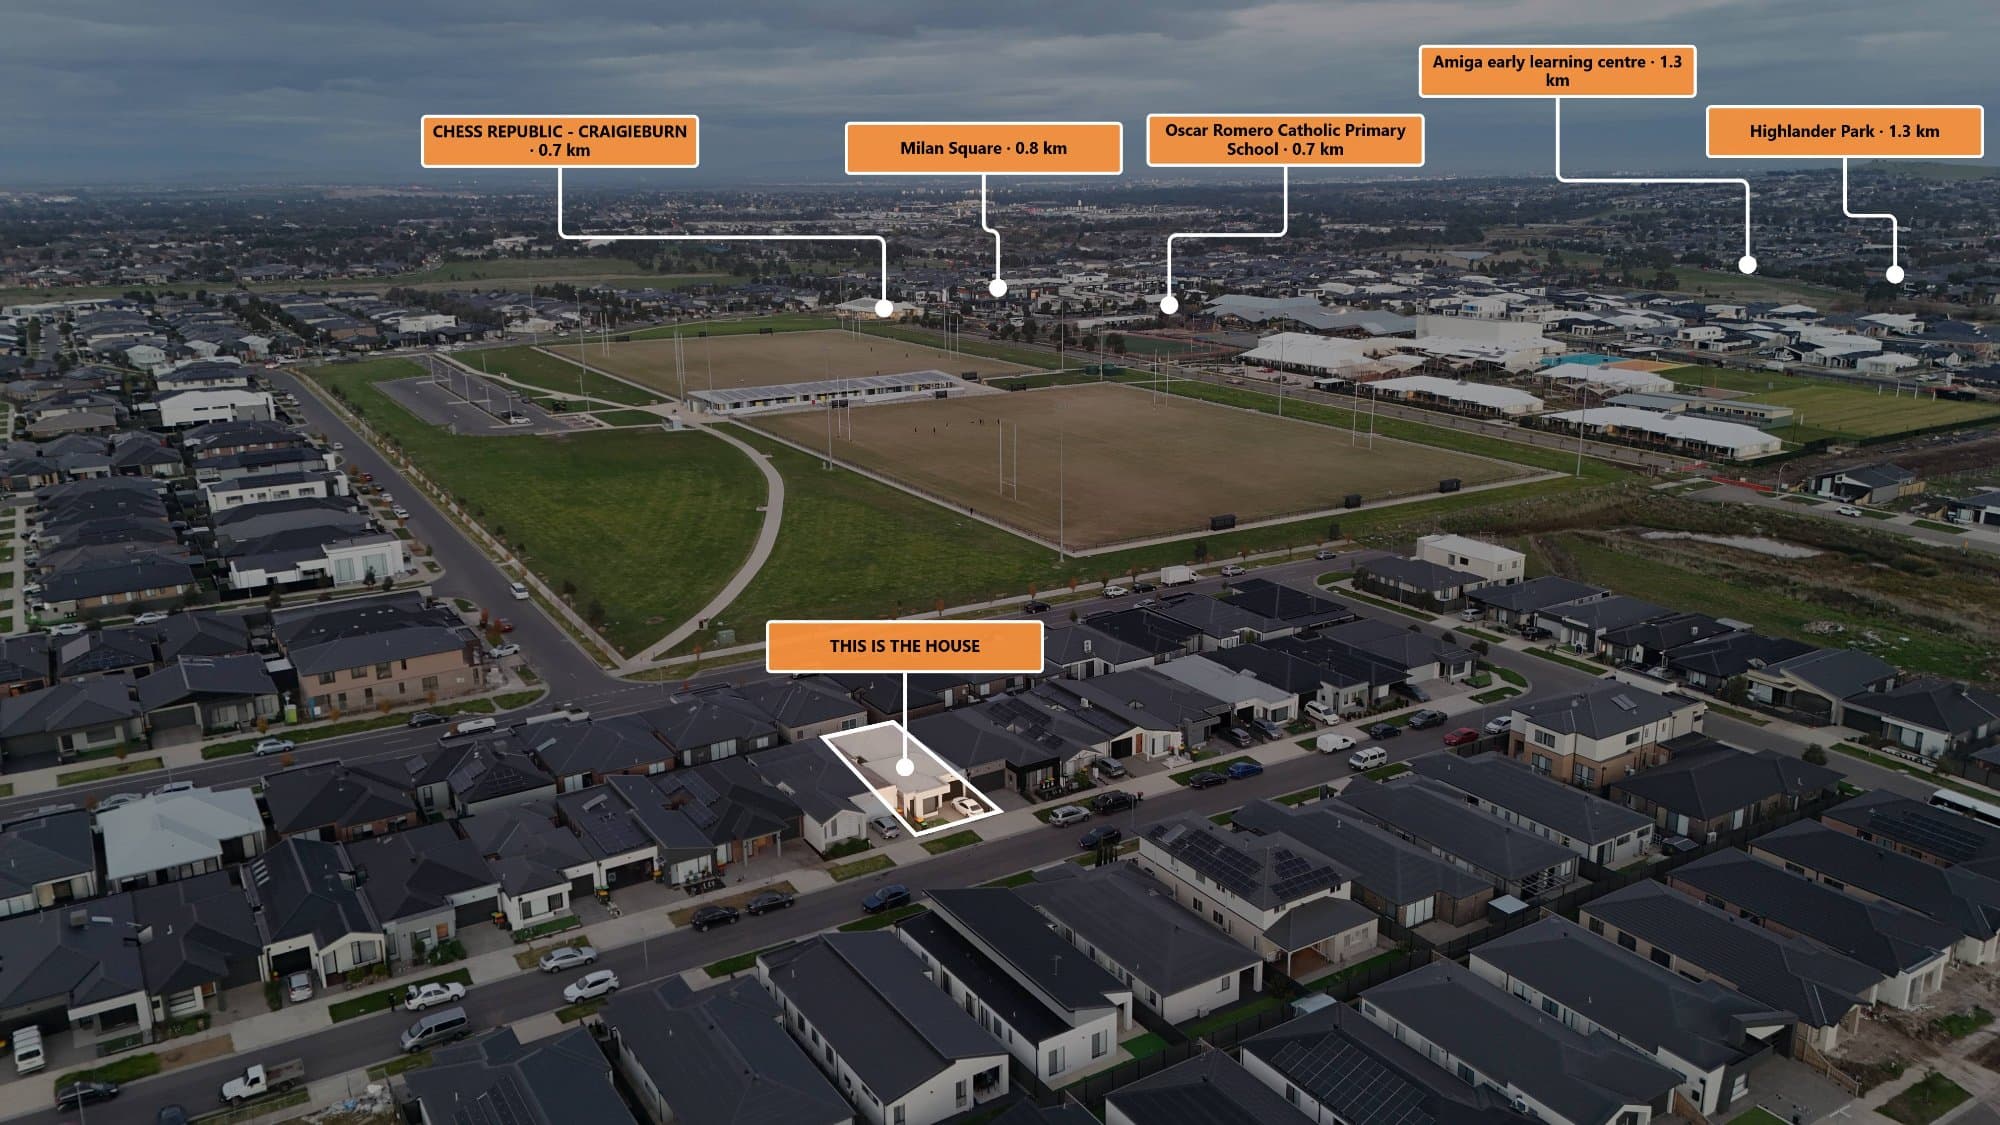
Aerial photography gives potential buyers a completely different perspective of a property. Instead of seeing only the house, an aerial photograph can show the backyard, surrounding streets, neighbouring properties, landscaping and the wider area.
But there is one problem: where exactly does the property begin and end?
For many properties, particularly large blocks, acreage and development sites, the boundary isn't obvious from a drone photograph.
Adding a property boundary overlay can make the aerial image much easier to understand and can create a more informative real estate marketing asset.
Why Add Property Boundaries to Aerial Photos?
A standard drone photograph can show an impressive amount of land, but buyers may not know which part of that land belongs to the property.
A boundary overlay can visually distinguish the property from its surroundings.
For example, an aerial image could show:
Property boundary
House
Backyard
Pool
Neighbouring properties
This provides useful context without requiring the viewer to interpret the entire aerial photograph themselves.
Which Properties Benefit Most?
Property boundaries can be particularly useful for:
- Acreage properties
- Large residential blocks
- Lifestyle properties
- Development sites
- Vacant land
- Properties with large backyards
- Rural properties
- Properties with irregular boundaries
For a standard suburban property, the boundary may be relatively obvious. For a large block, however, an aerial boundary overlay can make a much bigger difference.
How to Add a Boundary to a Drone Photo
There are several ways to create an aerial property boundary.
1. Manually Draw the Boundary
The traditional approach is to open the drone photograph in an image editor such as Adobe Photoshop.
You can create a new layer and manually draw a line around the property.
This gives you complete visual control, but it can be time-consuming when you're processing multiple properties.
2. Use Mapping Data
Another approach is to use geographic property data to identify the boundary.
The boundary can then be displayed over aerial imagery.
This can provide a more consistent workflow, but it requires appropriate geographic data and software capable of working with it.
3. Use Dedicated Aerial Annotation Software
A third option is using software designed specifically for aerial property annotation.
A tool such as AerialPin can simplify the process by providing a workflow specifically for real estate photographers who need to annotate drone images.
Instead of building the graphic from scratch every time, the photographer can work directly with the aerial image and add the relevant property information.
Make the Boundary Easy to See
The boundary should be visible without overwhelming the photograph.
A common mistake is using a line that is either too thin to see or so prominent that it becomes the main feature of the image.
Consider:
- Line thickness
- Transparency
- Contrast
- Colour
- Background
- Image resolution
The boundary should guide the viewer's eye rather than distract from the property.
Add a Property Label
Once the boundary has been added, you can identify the property itself.
A simple label such as:
SUBJECT PROPERTY
can immediately clarify which land is being marketed.
This is particularly useful when the aerial photograph includes several neighbouring properties.
Add Nearby Points of Interest
Property boundaries don't have to be the only information displayed.
You can also add nearby points of interest such as:
- Parks
- Schools
- Shopping centres
- Train stations
- Beaches
- Sporting facilities
- Major roads
This can turn the image into a location-focused marketing graphic.
For example:
SUBJECT PROPERTY
↓ 400 m
LOCAL PARK
↓ 900 m
SHOPPING CENTRE
This provides buyers with a visual understanding of the surrounding area.
Add Distance Measurements
Distance markers can provide additional context.
Instead of simply labelling a nearby location, you can show the approximate distance from the property.
For example:
350 m — Park
850 m — Shopping Centre
1.1 km — Train Station
Accurate location data should be used, and photographers should avoid presenting approximate marketing measurements as survey-grade measurements.
Don't Overload the Image
More information isn't always better.
An aerial photograph covered with labels, lines and icons can quickly become difficult to understand.
Focus on the information that actually helps sell the property.
A clean graphic might only contain:
Property boundary
Property label
2–4 important nearby locations
Distance measurements
That is often enough to provide useful context while keeping the photograph visually appealing.
AerialPin for Property Boundary Annotations
AerialPin is designed specifically for workflows like this.
Real estate photographers can use it to create annotated aerial property images without relying entirely on a general-purpose image editing workflow.
The idea is to make repetitive tasks such as adding boundaries, labels and points of interest quicker and easier.
This can be particularly useful for photographers delivering aerial images to multiple real estate agents every week.
Important: Property Boundaries Are Not Legal Surveys
Aerial property annotations should be treated carefully.
A marketing boundary overlay should not automatically be considered a legal property boundary.
If a precise legal boundary is required, appropriate cadastral, survey or authoritative property data should be used.
Photographers and agents should also make sure that any claims made using aerial annotations are accurate and appropriately presented.
Why Property Boundary Annotations Matter
Real estate photography is becoming increasingly visual.
Buyers don't just want to see the inside of a house. They want to understand the property, the land and the surrounding area.
An annotated aerial photograph can communicate all three in one image.
The photograph shows the property.
The boundary shows the land.
The labels show the surrounding location.
That's what makes aerial property annotation such a useful addition to modern real estate marketing.
Final Thoughts
Adding property boundaries to drone photos doesn't have to be a complicated process.
Whether you're manually creating overlays, using geographic data or using specialised annotation software, the objective is the same: make the aerial photograph easier for potential buyers to understand.
For photographers who regularly deliver aerial images, automating repetitive annotation tasks can save time and create more consistent results.
AerialPin helps real estate photographers turn drone photographs into informative, professional property marketing images with boundaries, labels and location information.