
How to Automatically Add Locations to Drone Images Without Google Maps
Learn how to automatically add nearby locations, points of interest and labels to drone images without manually searching Google Maps for every property.
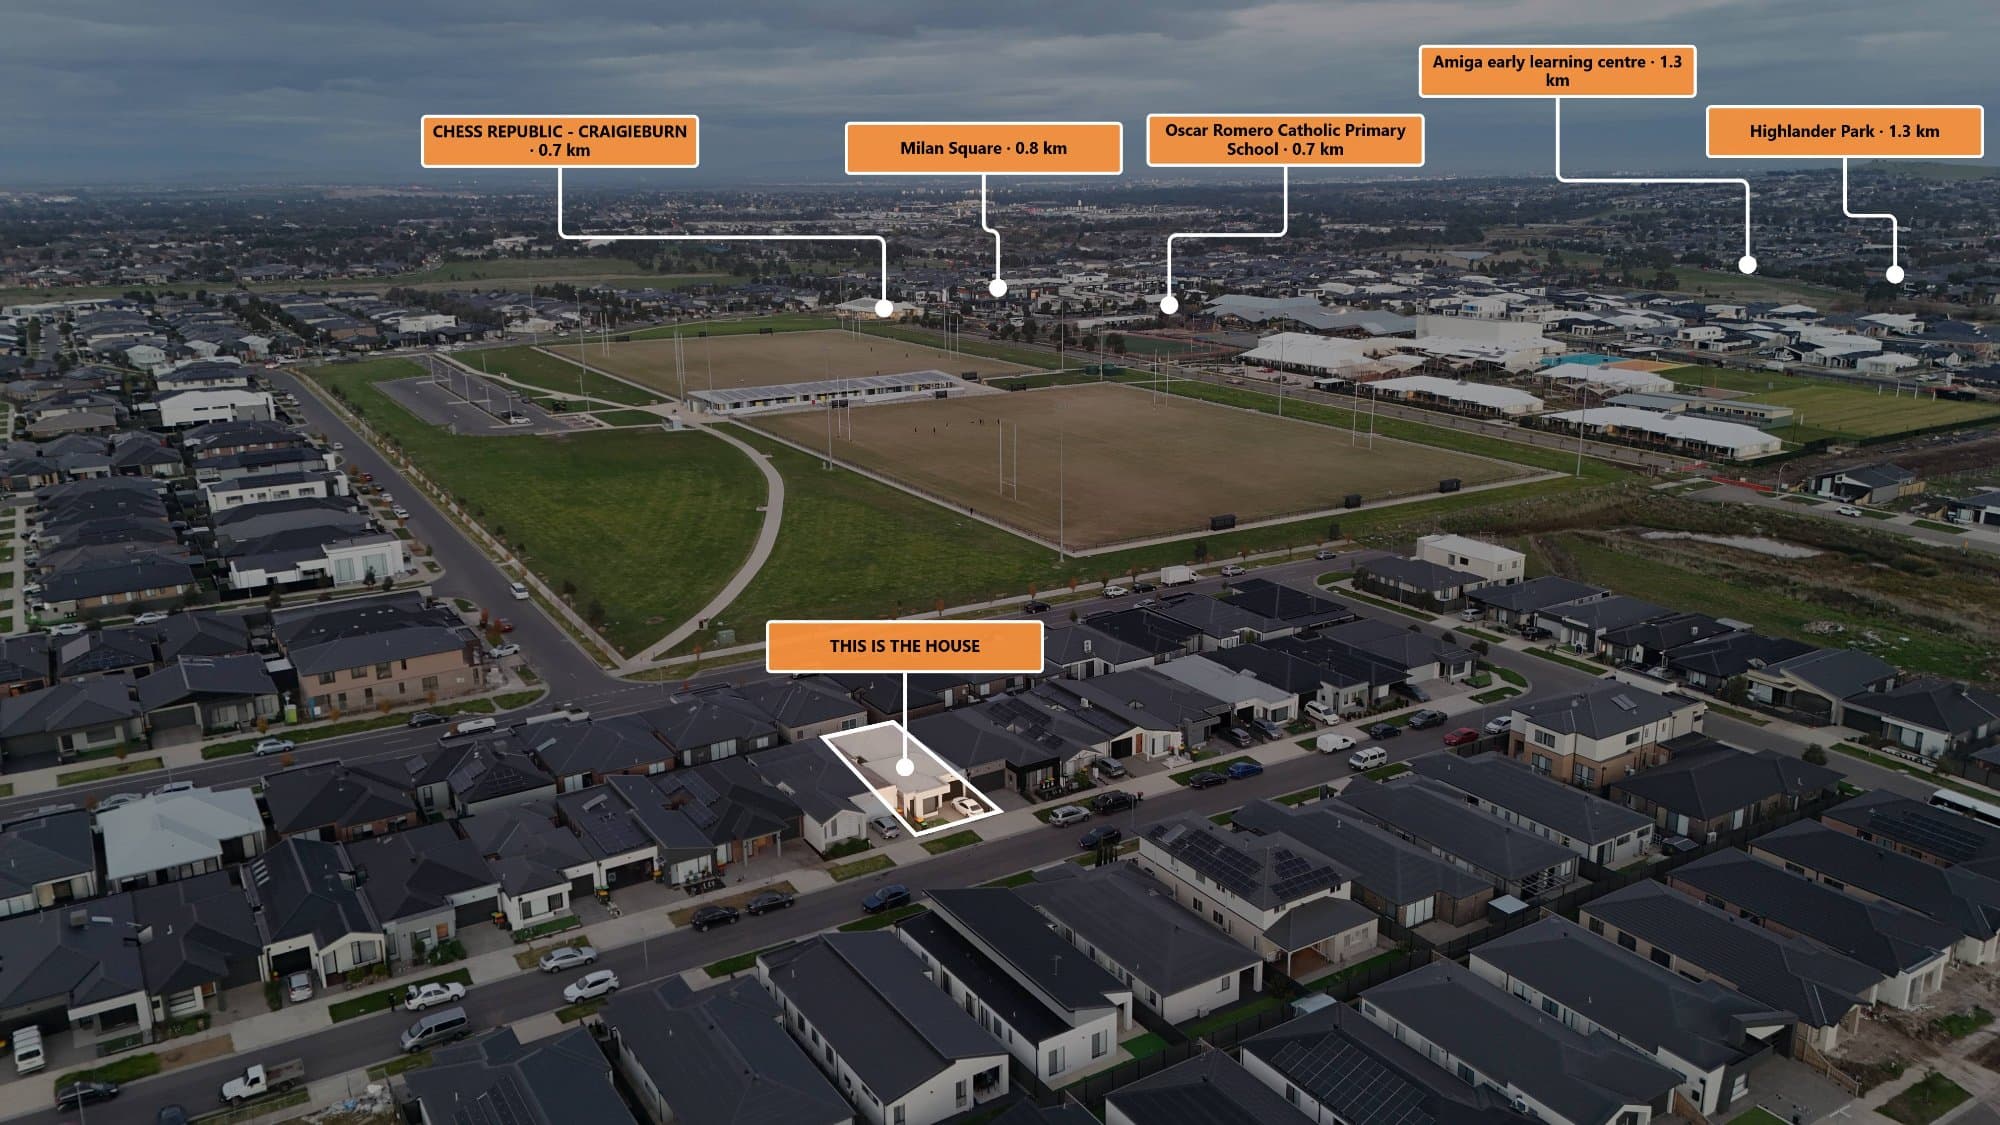
Real estate photographers often use drone photography to show a property from above. But an aerial image can become even more useful when it includes nearby locations such as parks, schools, shopping centres, train stations and major roads.
The problem is that adding these locations manually can take time.
You may need to open a map, search for nearby places, copy the names, work out the distances and then manually position each label on the drone photograph.
For photographers processing multiple properties, this can become a repetitive part of the editing workflow.
Fortunately, it is possible to automatically add locations to drone images without manually using Google Maps.
Why Add Locations to Drone Photos?
An aerial property photograph shows the physical property, but nearby locations provide context.
For example, a drone image could identify:
- Local parks
- Schools
- Shopping centres
- Train stations
- Sporting facilities
- Beaches
- Cafes
- Major roads
- Public transport
- Waterways
Instead of simply showing a house from above, the image can help communicate where the property is located.
This can be particularly useful for real estate marketing.
How Can a Drone Image Know Where It Was Taken?
Many modern drones store location information inside the photograph.
This information is commonly contained within the image's EXIF metadata.
Depending on the drone and camera, the metadata may contain information such as:
- GPS latitude
- GPS longitude
- Camera information
- Date and time
- Altitude
- Camera settings
If GPS coordinates are available, software can use those coordinates as the starting point for identifying nearby locations.
This means you don't necessarily have to manually type the property's address every time.
Step 1: Extract the GPS Coordinates
The first step is reading the GPS information from the original drone photograph.
For example, a photograph may contain coordinates such as:
Latitude: -37.XXXX
Longitude: 144.XXXX
Those coordinates provide a geographical reference for the photograph.
If the image does not contain GPS metadata, the location may need to be entered manually.
Step 2: Find Nearby Locations Automatically
Once the coordinates are available, software can search a location database for nearby places.
For example, the system could identify:
350 m — Local Park
700 m — Shopping Centre
1.1 km — Train Station
1.4 km — Primary School
The photographer doesn't need to manually search for each location.
The software does the location lookup based on the drone image's geographical position.
Step 3: Choose Which Locations to Display
Automatically finding every nearby place isn't necessarily useful.
A property could have hundreds of businesses, roads and other locations nearby.
Instead, the photographer should be able to choose the types of places that are relevant.
For example:
Parks
Schools
Shopping
Transport
Sport
Water
This keeps the final aerial image clean and focused.
Step 4: Automatically Position the Labels
Finding a location is only half the problem.
The location also needs to be represented visually on the photograph.
An annotation system can calculate where a nearby location sits relative to the property and place a marker and label accordingly.
For example:
SUBJECT PROPERTY
↓ 450 m
PARK
This creates a much more useful aerial marketing image.
Step 5: Automatically Calculate Distances
Once the coordinates of the property and nearby location are known, software can calculate the approximate distance between them.
This means photographers don't need to manually measure every location.
The final image could display:
500 m → Shopping Centre
750 m → Train Station
300 m → Park
Distances should be presented appropriately and should not imply survey-grade precision unless the underlying data supports it.
Doing This Without Manually Using Google Maps
A common workflow would be:
Open Google Maps → Search address → Find nearby places → Copy information → Open Photoshop → Add markers → Add labels → Add distances → Export
This works, but it involves several separate applications and manual steps.
A specialised workflow can instead look like:
Upload drone image → Read GPS → Find nearby locations → Select locations → Automatically place labels → Export
This removes much of the repetitive work.
AerialPin and Automatic Location Annotation
AerialPin is designed around the workflow of real estate drone photography and aerial property annotation.
When a drone photograph contains usable location information, the workflow can use that geographical information to help identify nearby points of interest.
This can be useful for photographers who regularly need to create annotated aerial property images for agents.
Instead of manually researching every property, the goal is to make location annotation part of the same workflow as preparing the aerial image.
What If the Drone Image Doesn't Have GPS?
Not every photograph will contain usable GPS information.
In that situation, a photographer can provide the property location manually.
For example:
Enter property address → Locate property → Search nearby locations → Add annotations
This gives photographers a fallback when EXIF metadata isn't available.
It is particularly useful when images have been exported or edited by another application that removed the original metadata.
Why Automatic Location Annotation Saves Time
Imagine processing 20 property shoots.
If each aerial photograph requires manually finding five nearby locations, you could spend a significant amount of time repeating the same research.
Automation changes the workflow.
Instead of researching every property individually, the software can use the photograph's location to help identify relevant places automatically.
For real estate photographers, that means less time spent on repetitive editing and more time spent shooting, editing and delivering property campaigns.
Keep the Final Image Clean
Automatic annotation shouldn't mean adding as much information as possible.
The best aerial property images usually keep the design simple.
Prioritise the locations that actually matter to a buyer.
For example:
Property
Nearby park
Shopping centre
Train station
That may be more effective than covering the entire photograph with dozens of labels.
Final Thoughts
Automatically adding locations to drone images can turn a standard aerial photograph into a much more informative real estate marketing asset.
By using GPS information from the drone photograph, software can identify nearby points of interest, calculate distances and help position labels without requiring the photographer to manually research every location.
For real estate photographers working with multiple properties, this can make aerial annotation significantly faster.
AerialPin is built around this idea: use the information already contained in your aerial photographs to reduce repetitive annotation work and create professional property marketing images faster.
Capture the property. Upload the image. Let the location data do more of the work.