
How to Edit Real Estate Drone Photos Like a Professional (2026 Guide)
Capturing a great drone photo is only half the job. Professional editing transforms an ordinary aerial image into a polished marketing asset that attracts buyers and helps real estate listings stand out.
Why Editing Drone Photos Matters
Even the latest DJI drones produce images that benefit from editing. Straight out of the camera, drone photos can look flat, hazy or slightly underexposed.
Professional editing helps you:
- Improve colour and contrast
- Recover highlights and shadows
- Straighten the horizon
- Enhance sharpness
- Remove distractions
- Create a brighter, cleaner image
- Showcase the property in its best light
A polished aerial photo doesn't just look better—it helps tell the story of the property and can make a listing stand out from the competition.
1. Shoot in RAW Whenever Possible
If your drone supports it, always shoot in RAW rather than JPEG.
RAW files retain much more image information, giving you greater flexibility when editing exposure, colours and white balance without reducing image quality.
Benefits include:
- Better dynamic range
- Improved highlight recovery
- Cleaner shadows
- More natural colours
- Higher-quality final images
2. Straighten the Horizon
One of the quickest ways to make a drone photo look amateur is a crooked horizon.
Before making any colour adjustments:
- Level the horizon.
- Correct perspective if necessary.
- Ensure buildings appear straight.
- Keep vertical lines natural.
It's a small adjustment that makes a big difference.
3. Adjust White Balance
Different lighting conditions can make photos appear too warm or too cool.
Aim for natural-looking colours by adjusting the white balance until:
- Grass looks green—not yellow.
- Roof colours appear accurate.
- Concrete looks neutral.
- Water appears natural.
- The sky retains realistic blue tones.
Avoid pushing colours too far. Buyers expect images that accurately represent the property.
4. Recover Highlights and Shadows
Aerial photos often contain bright skies and darker areas around buildings or gardens.
Reduce highlights to bring back cloud detail, and lift shadows to reveal landscaping without making the image look artificial.
The goal is balanced exposure across the entire scene.
5. Improve Contrast
Adding a little contrast gives the image more depth and clarity.
Instead of increasing the Contrast slider dramatically, make subtle adjustments to:
- Whites
- Blacks
- Midtones
- Tone Curve
Small changes usually create the most natural-looking results.
6. Enhance Colours Naturally
Colour plays a huge role in making a property feel inviting.
Focus on enhancing:
- Green lawns
- Trees and gardens
- Blue skies
- Water features
- Roof colours
Resist the temptation to oversaturate the image. Natural colours build trust with buyers.
7. Remove Distractions
Clean images feel more premium.
Remove anything that distracts from the property, including:
- Cars parked in awkward positions
- Construction materials
- Rubbish bins
- Temporary signage
- Sensor dust
- Lens spots
A few minutes of retouching can dramatically improve the final result.
8. Sharpen Carefully
Sharpening helps bring out detail, but too much can create halos around buildings and trees.
Apply sharpening moderately so the image remains crisp without looking overprocessed.
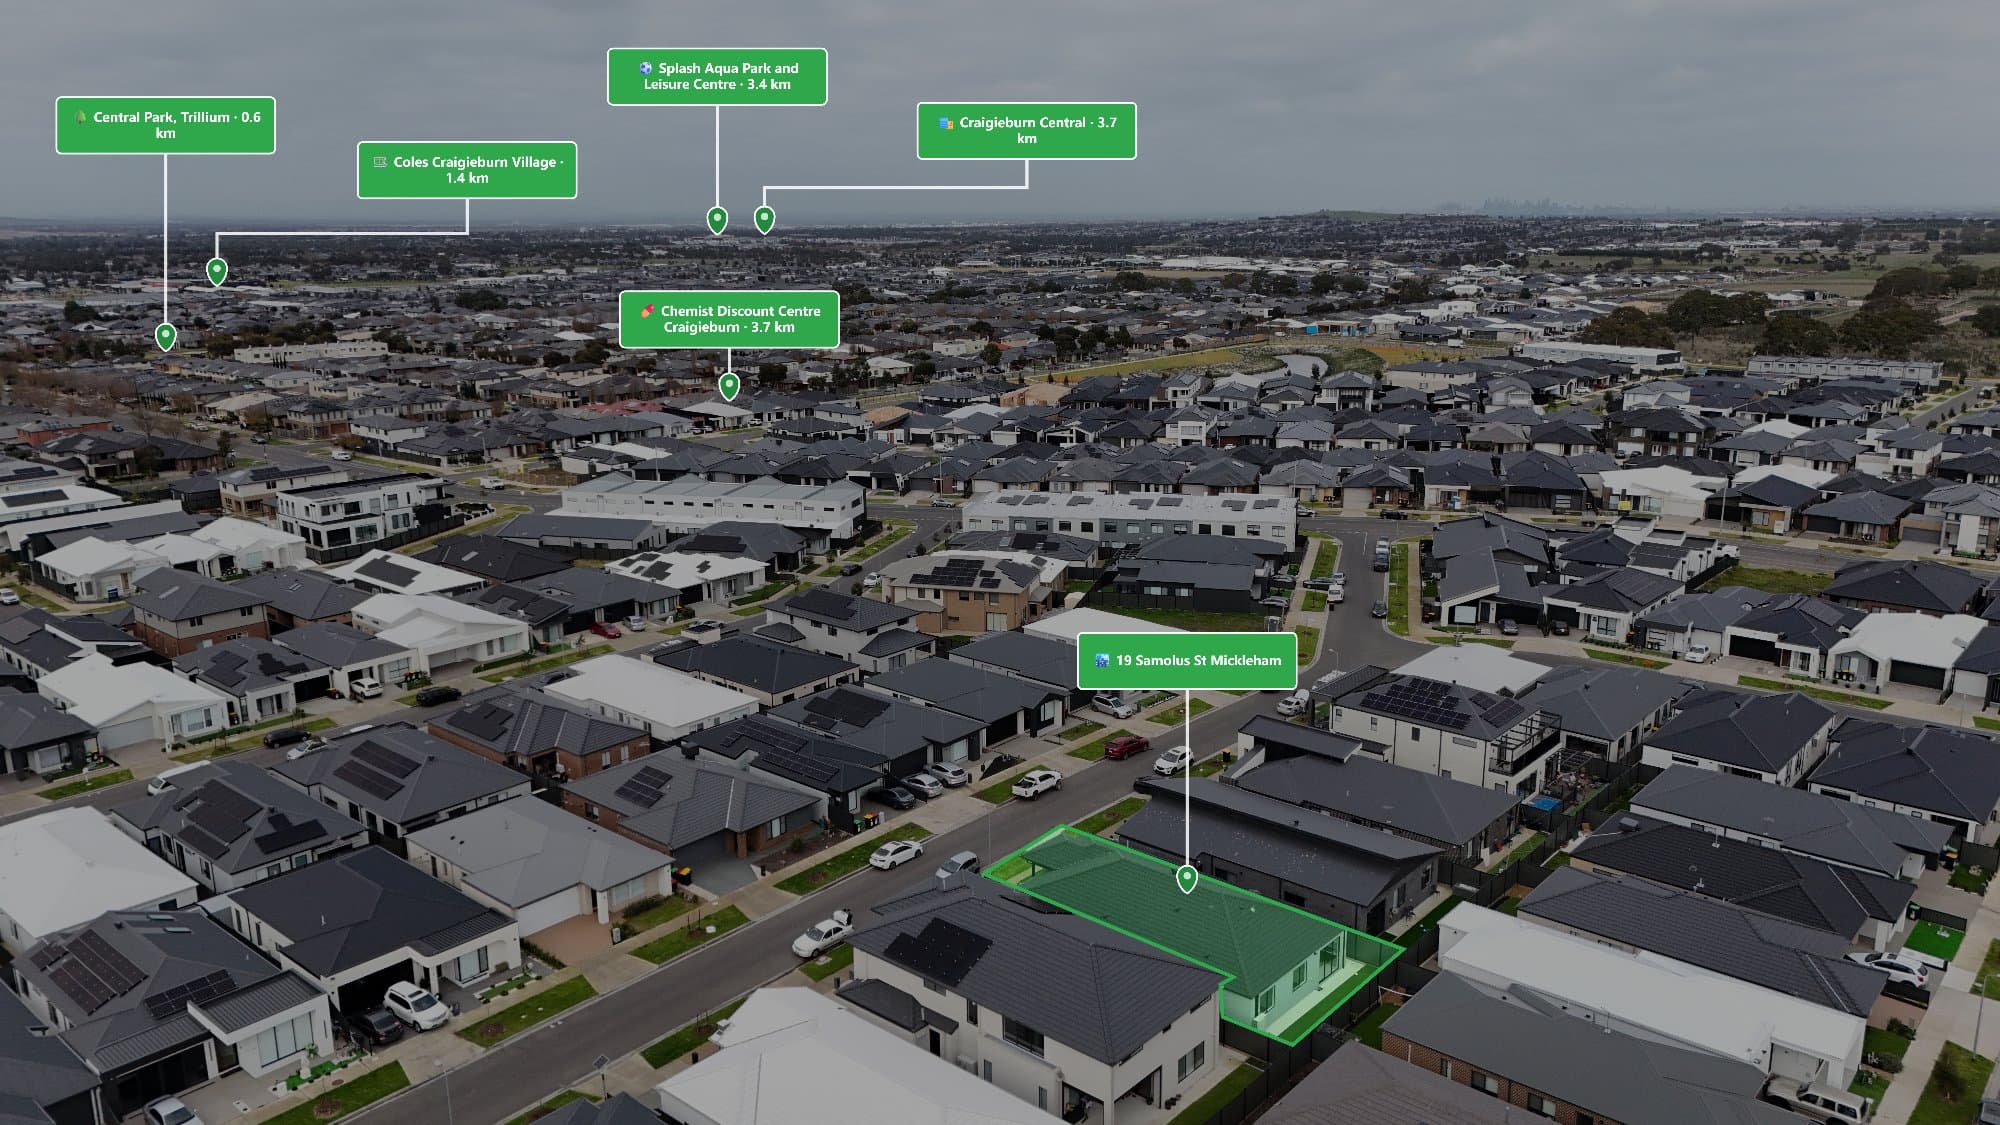
9. Add Points of Interest
One of the biggest advantages of drone photography is showing buyers what surrounds the property.
Adding points of interest such as:
- Schools
- Parks
- Shopping centres
- Train stations
- Beaches
- Hospitals
- Cafés
- Universities
helps buyers instantly understand the location and lifestyle on offer.
Instead of manually creating labels in Photoshop, AerialPin lets you search nearby amenities, place custom markers and export professional aerial maps in just a few minutes.
10. Export for Real Estate Listings
Before delivering the final images:
- Export high-resolution JPEG files.
- Use the sRGB colour profile for web compatibility.
- Balance image quality with file size.
- Check that text and labels remain sharp.
- Review the image on both desktop and mobile.
These final checks ensure your aerial photos look great across listing websites and social media.
Common Drone Photo Editing Mistakes
Avoid these common errors:
- Oversaturated grass
- Unrealistic HDR effects
- Crooked horizons
- Over-sharpening
- Artificial-looking skies
- Crushed shadows
- Blown-out highlights
- Excessive clarity
Subtle editing almost always produces more professional results.
Frequently Asked Questions
What is the best software for editing real estate drone photos?
Adobe Lightroom and Adobe Photoshop are the most popular choices for editing drone photos. If you want to add professional points of interest to aerial images, AerialPin simplifies the process without requiring manual Photoshop work.
Should I shoot RAW or JPEG?
RAW is recommended because it provides greater flexibility for editing exposure, colours and shadows while preserving image quality.
How long does it take to edit a drone photo?
For most experienced photographers, editing a standard real estate drone image takes between 5 and 15 minutes, depending on the level of retouching required.
Can I add schools and parks to my drone photos?
Yes. With AerialPin, you can quickly add nearby schools, parks, shopping centres, transport links and other landmarks to create informative aerial maps for your clients.
Final Thoughts
Professional drone photo editing is about enhancing the property's best features while keeping the image natural and accurate. A consistent workflow—from shooting in RAW and correcting colours to adding informative points of interest—can significantly improve the quality of your final images.
If you're looking to save time and create premium aerial marketing materials, AerialPin makes it easy to produce professional point-of-interest drone photos that help your listings stand out.