
How to Measure Distance on Aerial Photos
Learn how to measure distance on aerial photos using simple annotation tools. See how distance labels can help real estate agents, drone photographers and property marketers show the space between a property and nearby roads, parks, schools, beaches and other important locations.
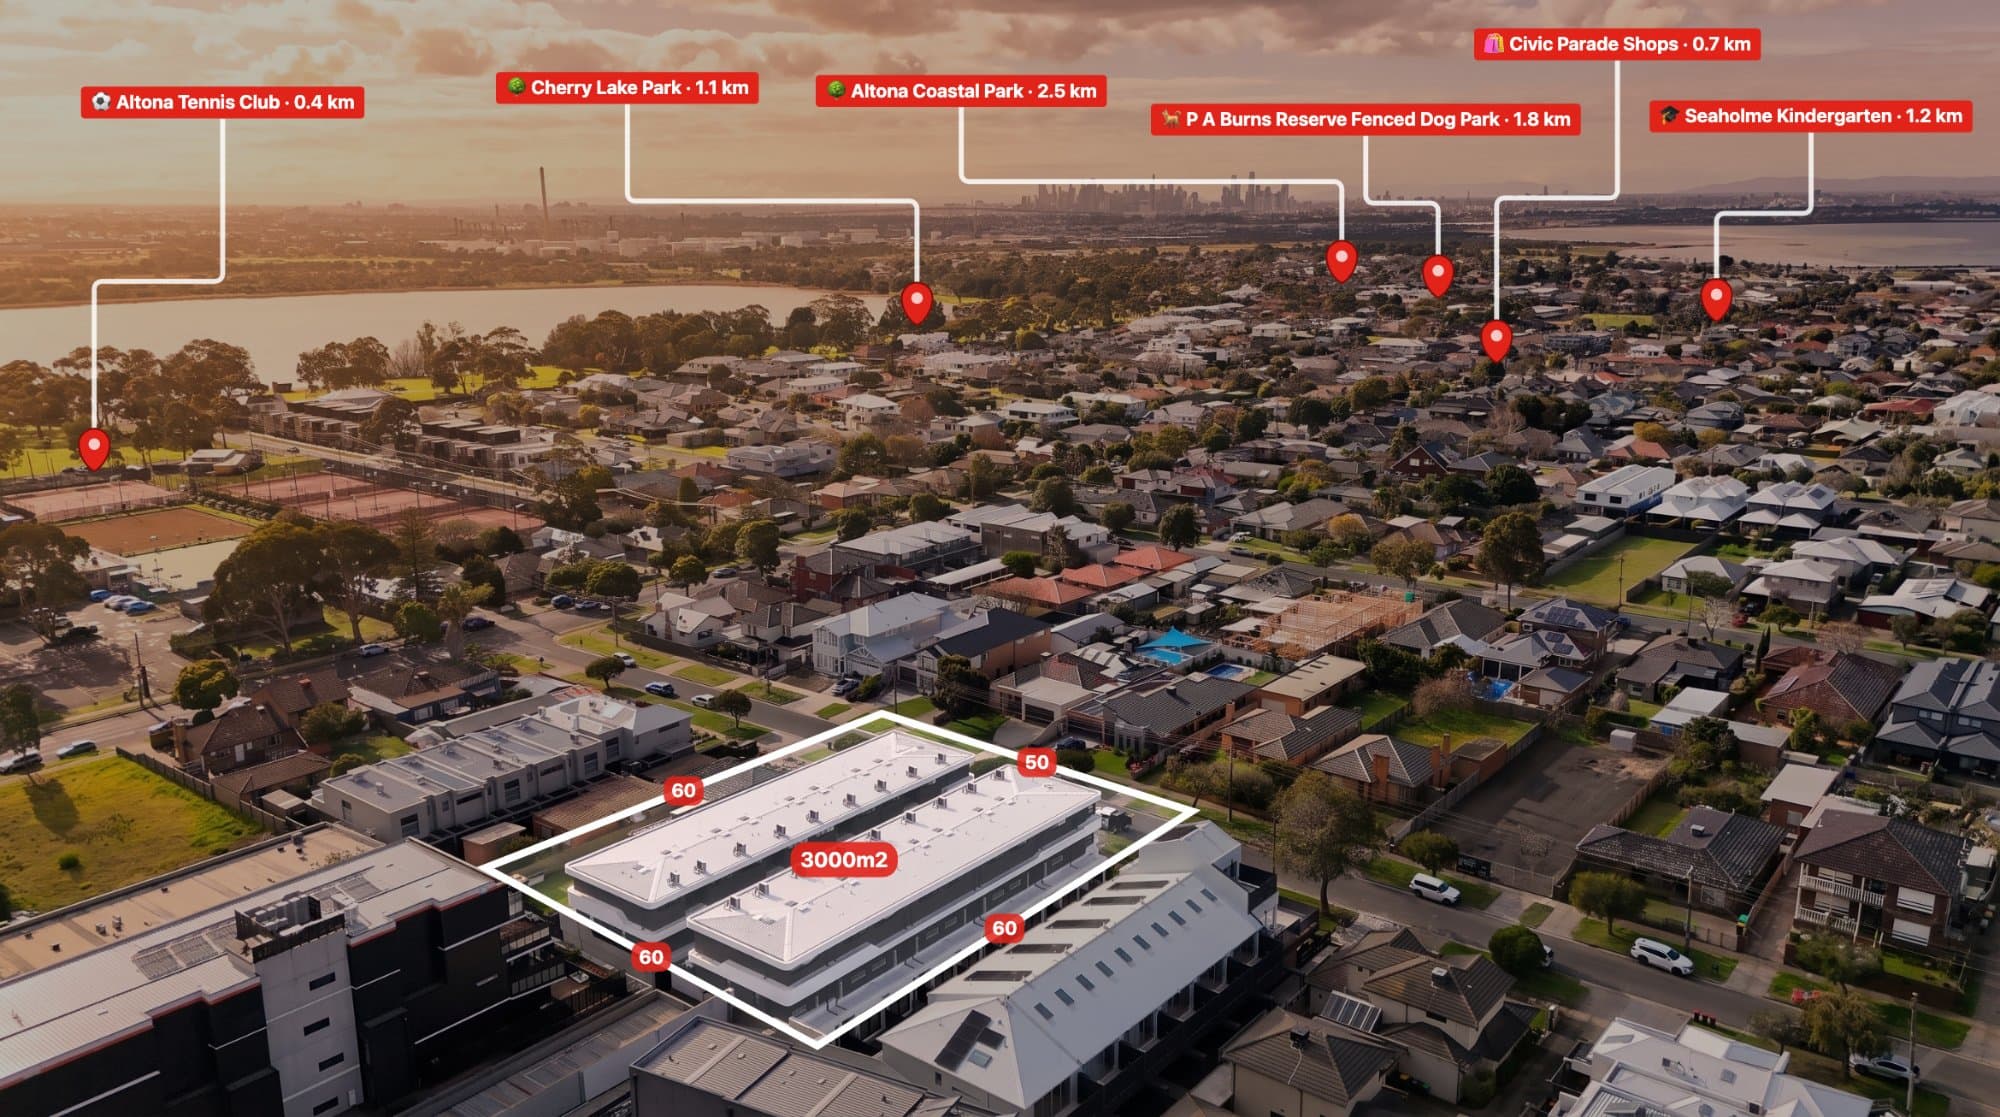
Measuring distance on an aerial photo can make a property image much more useful for real estate marketing. Instead of simply showing a large area from above, you can add clear distance labels that help viewers understand how close a property is to important locations.
This can be useful for real estate agents, drone photographers, property developers and land sellers who want to add more context to their aerial photography.
Why Measure Distance on Aerial Photos?
Aerial photos give people a much better view of a property and its surroundings, but it can still be difficult to understand scale.
For example, a buyer might want to know:
- How far the property is from a main road
- How close it is to a park
- The distance to a beach or river
- How far a neighbouring property is
- The distance between different parts of a development
- How large an area appears from the aerial image
Adding a distance measurement directly onto the image makes this information much easier to understand.
It also saves the viewer from having to open another map or work out the distance themselves.
How to Measure Distance on an Aerial Photo
The basic process is straightforward.
1. Upload your aerial photo
Start with a drone photo that clearly shows the property and surrounding area.
For the best results, use an image with enough surrounding context to show the locations you want to measure.
2. Identify the two points
Choose the starting point and ending point for your measurement.
For example, you might measure from the centre of a property to:
- A nearby road
- A park entrance
- A beach
- A school
- A shopping area
- A neighbouring development
3. Draw the measurement
Use an aerial photo annotation tool to draw a line between the two points.
The software can then display the calculated distance directly on the image.
4. Add a clear label
Make the measurement easy to read.
A simple label such as:
350 m to Park
is much easier for a potential buyer to understand than an unlabeled line.
Measuring Distance for Real Estate Marketing
Distance measurements can be particularly useful in property marketing.
A standard aerial photo might show a house surrounded by streets and nearby properties. Adding measurements can turn that same image into a much more informative marketing graphic.
For example:
450 m to local shopping
700 m to park
1.2 km to beach
300 m to main road
These labels provide useful context without requiring a long description underneath the image.
Use Distance Measurements With Location Pins
Distance measurements become even more useful when combined with location pins.
You can place a pin on an important location and then measure the distance between that location and the property.
For example, you could create an aerial image showing:
Property → School
Property → Park
Property → Train Station
This creates a simple visual representation of the property's surroundings.
AerialPin is designed for this type of aerial photo annotation, allowing you to add locations, measurements, labels and other information directly to drone images.
Measure Distances From Drone Photos With GPS Data
Many drone photographs contain GPS information in their EXIF metadata.
This can provide the coordinates where the photograph was taken and can help with placing the image in its geographic context.
However, it is important to understand what GPS data does and does not tell you.
Drone GPS coordinates identify the camera's location when the photograph was captured. They do not automatically provide legal property boundaries or cadastral information.
If you are creating property marketing material, measurements and boundaries should be checked against the appropriate mapping or cadastral data where accuracy is important.
You can also inspect drone metadata using AerialPin's EXIF tools.
How Accurate Are Aerial Photo Measurements?
The accuracy of a measurement depends on the geographic information being used.
A measurement based on known geographic coordinates can be considerably more useful than simply drawing a line across an image by eye.
However, the result can still be affected by:
- GPS accuracy
- Image positioning
- Camera angle
- Mapping data
- The exact points selected
- Image distortion
- The source of the geographic data
For property marketing, measurements should generally be treated as visual information rather than a replacement for a professional survey.
Straight-Line Distance vs Travel Distance
There is also an important difference between straight-line distance and travel distance.
An aerial photo measurement normally represents the direct distance between two points.
For example, a property might be:
500 m from a park in a straight line
but the actual walking or driving distance could be longer because of roads, fences, rivers or other obstacles.
When publishing an aerial marketing image, make it clear what the measurement represents if there could be confusion.
Add Multiple Measurements to One Drone Photo
You don't have to limit an aerial image to a single measurement.
For a larger property or development, several measurements can be added to the same image.
For example:
- 250 m to the nearest road
- 600 m to a park
- 900 m to a school
- 1.4 km to a shopping centre
The key is to keep the image clean.
Too many lines and labels can make an aerial photo difficult to read. Use only the measurements that actually help explain the property.
Make Distance Labels Easy to Read
Good annotation is about more than accuracy. The information also needs to be visually clear.
Use:
- Short labels
- Consistent formatting
- Clear measurement lines
- Readable text
- Enough spacing between annotations
- A logical visual hierarchy
The property itself should remain the main focus of the image.
Measurements should support the photograph rather than cover it.
Combine Measurements With Property Boundaries
Distance measurements can also be combined with property boundary overlays.
For example, an aerial marketing graphic could show the property boundary, nearby locations and distances from the property.
This can be particularly useful for:
- Land sales
- Development sites
- Acreage properties
- New subdivisions
- Commercial properties
- Large residential blocks
For boundary information, always make sure the source data is appropriate for the purpose. A drone's GPS metadata should not be presented as an official cadastral boundary.
A Faster Way to Annotate Aerial Photos
Using Photoshop or manually creating graphics can take time, especially when you are producing multiple property marketing images.
A browser-based annotation workflow can make the process much faster.
With AerialPin, you can work directly with aerial images and add location pins, measurements, property boundaries and text without having to build the graphic from scratch in a traditional image editor.
For real estate photographers and drone operators producing images for multiple properties, having these tools in one workflow can save a lot of repetitive work.
Final Thoughts
Measuring distance on aerial photos is a simple way to add more useful information to property marketing images.
Instead of asking viewers to work out where everything is themselves, you can show the relationship between the property and important nearby locations directly on the image.
For real estate agents, drone photographers, developers and land sellers, a well-designed aerial photo with clear measurements can communicate a lot of information in a single image.