
Real Estate Drone Photography Tips: How to Create Better Aerial Property Images
Learn the best real estate drone photography tips for capturing aerial property images, showcasing land, adding boundaries and creating better property marketing content.
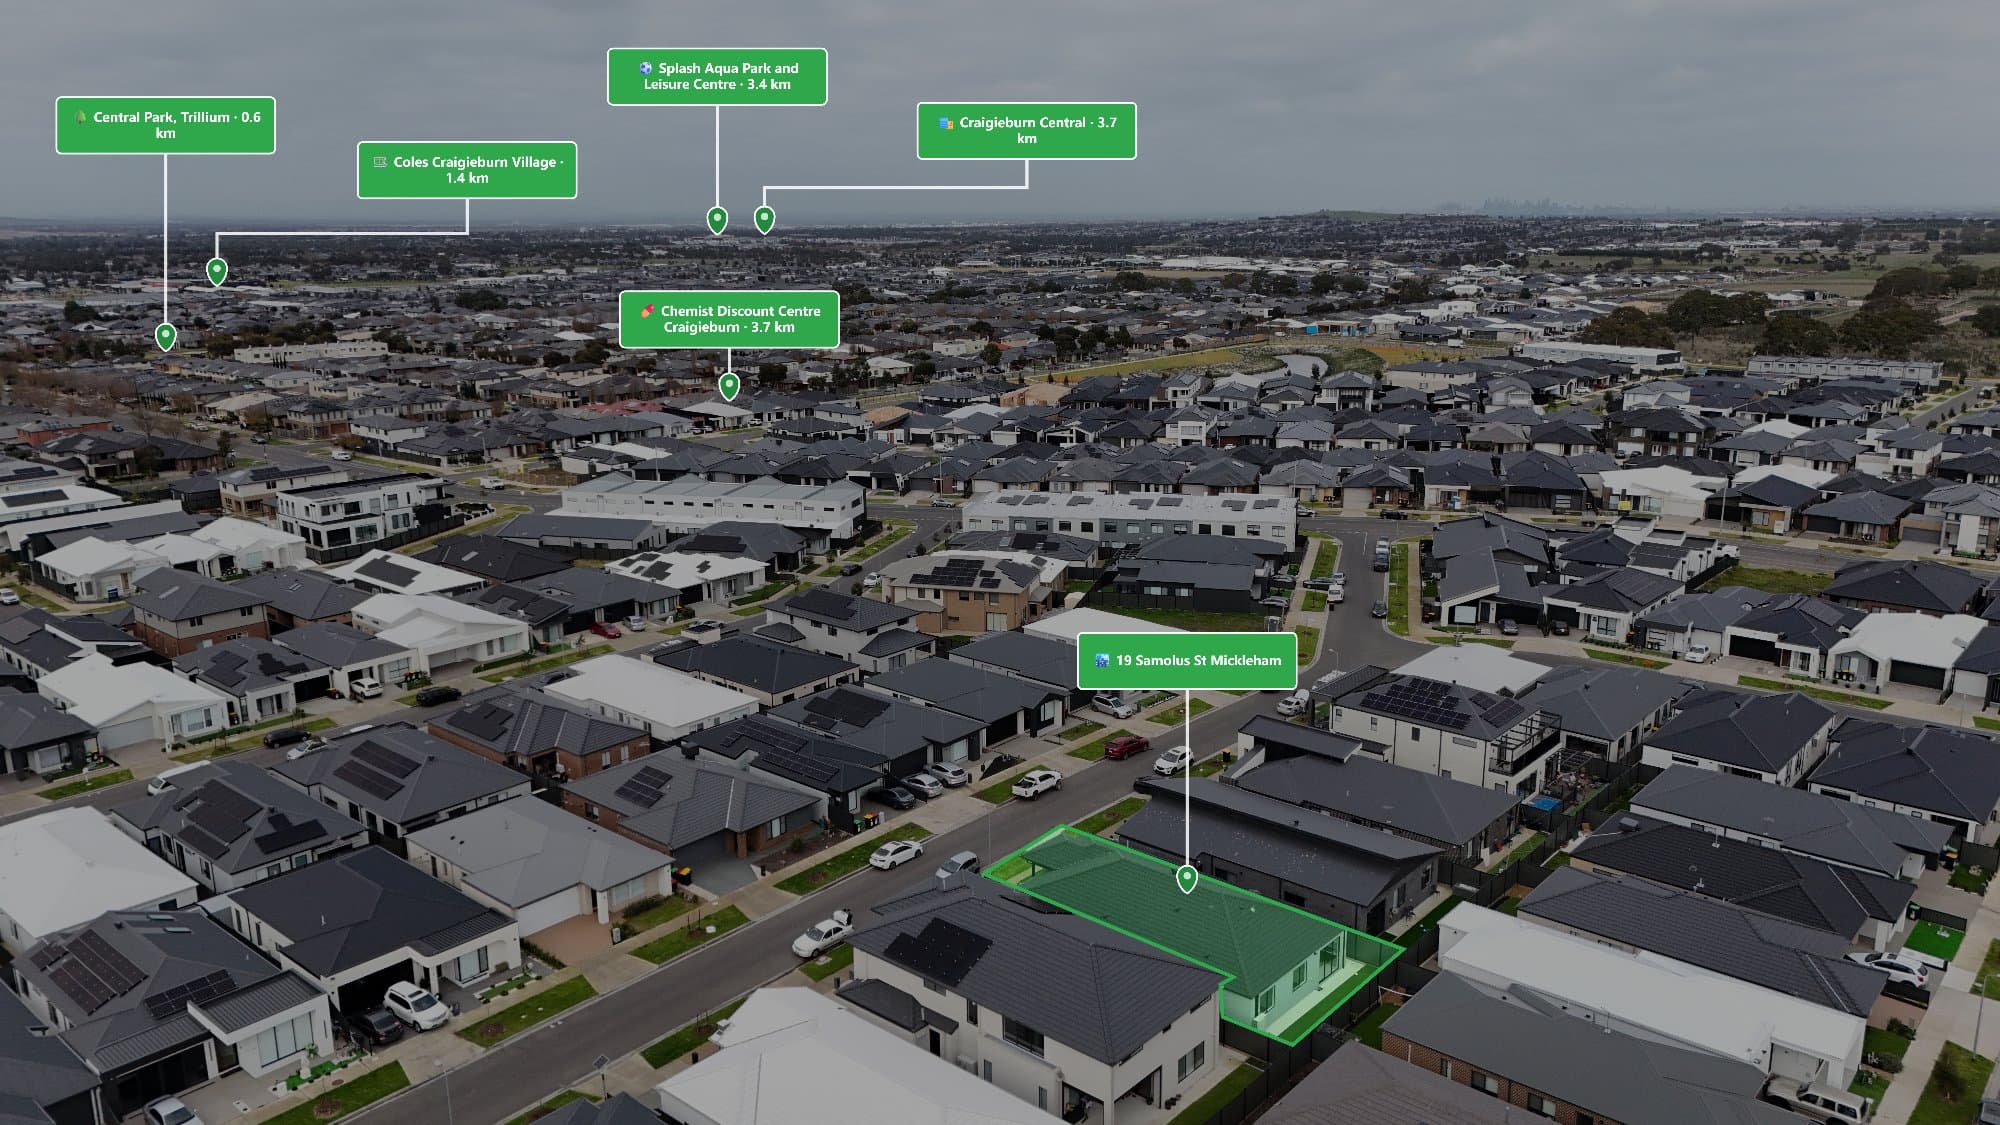
Real estate drone photography has changed the way properties are presented online. Instead of showing buyers only the house and backyard from ground level, drone photography can provide an aerial view of the entire property and its surroundings.
For real estate photographers, learning how to capture and prepare better aerial property images can help create more useful marketing assets for agents and property campaigns.
From choosing the right altitude to adding property boundaries and points of interest, here are some practical real estate drone photography tips.
1. Plan the Aerial Shot Before Taking Off
Before launching your drone, consider what the photograph needs to communicate.
Ask yourself:
- How large is the property?
- What surrounding features are important?
- Is there a pool or large backyard?
- Is the property near a park?
- Is there water nearby?
- Does the property have a long driveway?
- Would showing neighbouring streets provide useful context?
Planning the shot beforehand can help you capture an aerial photograph that tells a story rather than simply showing the roof of the house.
2. Choose the Right Height
Flying higher isn't always better.
A high-altitude photograph may show a large amount of surrounding land but make the actual property difficult to identify.
A lower aerial photograph can provide more detail but may not show enough surrounding context.
The ideal height depends on the property and the purpose of the photograph.
For example, a suburban home may benefit from a lower aerial perspective, while an acreage property may require a wider view.
3. Show the Surrounding Area
One of the biggest advantages of drone photography is showing what's around a property.
Consider including:
- Streets
- Parks
- Sporting grounds
- Waterways
- Shopping areas
- Schools
- Beaches
- Nearby developments
This can help buyers understand the property's location rather than viewing the home in isolation.
4. Capture Multiple Angles
Don't rely on a single drone photograph.
Capture a range of perspectives during the shoot.
You might photograph:
Straight down: Useful for showing the shape and layout of the property.
45-degree angle: Useful for showing the home, land and surrounding area together.
Low aerial angle: Useful for creating a more cinematic property photograph.
Having multiple options gives the agent more flexibility when selecting images for the listing.
5. Photograph the Property at the Right Time
Lighting can have a major effect on aerial property photography.
Early morning and late afternoon can produce softer light and longer shadows, while harsh midday sunlight can create strong contrast.
For luxury properties, twilight drone photography can also create a dramatic marketing image.
Think about how the light interacts with:
- The house
- Pool
- Landscaping
- Driveway
- Outdoor entertaining areas
6. Use Drone Photography to Show Property Size
Aerial imagery can be particularly effective for properties where land size is an important selling point.
Large backyards, acreage and expansive gardens can be difficult to communicate through ground-level photographs.
A drone image can show the relationship between the house and the entire block.
This is especially useful for:
- Acreage properties
- Large residential blocks
- Lifestyle properties
- Development sites
- Vacant land
7. Add Property Boundaries
Aerial photographs don't always make property boundaries obvious.
Adding an approximate boundary overlay can help viewers understand which portion of the land belongs to the property being marketed.
This is one of the most useful annotations for real estate drone photography.
However, photographers should ensure the source data is appropriate and avoid presenting marketing overlays as legal survey information.
8. Add Nearby Points of Interest
Once you've captured the aerial photograph, you can add useful location information.
For example, you might highlight:
- Parks
- Schools
- Shopping centres
- Train stations
- Beaches
- Sporting facilities
This can turn a standard aerial photograph into a more informative property marketing image.
9. Keep Your Aerial Annotations Professional
Aerial annotations should enhance the photograph rather than dominate it.
Use a consistent visual system across your work.
For example:
- One or two fonts
- Consistent label sizes
- Simple icons
- Clear boundary lines
- Minimal text
- Consistent spacing
If you're producing aerial images for multiple real estate agencies, creating reusable presets can make your workflow significantly faster.
10. Avoid Manually Rebuilding Every Graphic
This is where many real estate photographers lose time.
You may capture ten different properties during a week and find yourself repeatedly:
- Drawing boundaries
- Adding labels
- Finding icons
- Searching for nearby locations
- Creating distance measurements
- Adjusting text
- Exporting files
While these tasks are relatively simple, repeating them over and over can become a significant part of the editing workflow.
Tools such as AerialPin are designed specifically to streamline this process.
11. Use AerialPin for Aerial Property Annotations
AerialPin is built for photographers who need to create annotated aerial images for real estate marketing.
Instead of treating every aerial image like a completely new Photoshop project, photographers can use a workflow focused specifically on property annotations.
You can create images featuring elements such as:
- Property boundaries
- Labels
- Points of interest
- Location markers
- Distance information
The objective is simple: make aerial annotation faster and easier for real estate photographers.
12. Remember Australian Drone Regulations
If you're photographing properties commercially in Australia, make sure your drone operations comply with the current requirements.
The Civil Aviation Safety Authority (CASA) provides information about Australian drone rules, registration and operating requirements.
Drone pilots should check the current regulations before conducting commercial property photography.
Why Aerial Photography Is Becoming Essential for Property Marketing
Real estate buyers want information quickly.
A listing might contain dozens of interior photographs, but an aerial image can communicate something completely different.
In one image, buyers can potentially see:
The home + the land + the street + the surrounding area.
When annotations are added, the image can communicate even more.
This makes drone photography particularly valuable for properties where location, land size and surrounding amenities are important selling points.
Final Thoughts
Great real estate drone photography isn't simply about flying a drone over a house and pressing the shutter.
It's about creating an image that helps potential buyers understand the property.
By planning your shots, choosing the right perspective, showing the surrounding area and adding useful annotations such as boundaries and points of interest, you can create aerial property images that are both visually appealing and informative.
For photographers handling multiple property shoots, streamlining the annotation process can save significant editing time.
Capture better aerial images. Annotate them faster. Deliver more useful property marketing content.
That's the workflow AerialPin is built to support.